Posts Tagged ‘ ubuntu

WireGuard on Kernel 5.6. Quick start

cd /tmp
wget https://kernel.ubuntu.com/~kernel-ppa/mainline/v5.6/linux-headers-5.6.0-050600_5.6.0-050600.202003292333_all.deb
wget https://kernel.ubuntu.com/~kernel-ppa/mainline/v5.6/linux-headers-5.6.0-050600-generic_5.6.0-050600.202003292333_amd64.deb
wget https://kernel.ubuntu.com/~kernel-ppa/mainline/v5.6/linux-image-unsigned-5.6.0-050600-generic_5.6.0-050600.202003292333_amd64.deb
wget https://kernel.ubuntu.com/~kernel-ppa/mainline/v5.6/linux-modules-5.6.0-050600-generic_5.6.0-050600.202003292333_amd64.deb

Install all downloaded deb’s

dpkg -i *.deb

Reboot server/PC by command reboot

After startup check the kernel version^

uname -a
Linux test-srv 5.6.0-050600-generic #202003292333 SMP Sun Mar 29 23:35:58 UTC 2020 x86_64 x86_64 x86_64 GNU/Linux

Test Wireguard on server

ip link add dev wg0 type wireguard
ip address add dev wg0 192.168.2.1/24
#get current state:
ip a s wg0
--
3: wg0: <POINTOPOINT,NOARP> mtu 1420 qdisc noop state DOWN group default qlen 1000
    link/none 
    inet 192.168.2.1/24 scope global wg0
       valid_lft forever preferred_lft forever

Add repository for ubuntu 18.04

add-apt-repository ppa:wireguard/wireguard 
apt-get update
apt-get install wireguard-tools resolvconf

Make some changes to Firewall on server

# to enable kernel relaying/forwarding ability on bounce servers
echo "net.ipv4.ip_forward = 1" >> /etc/sysctl.conf
echo "net.ipv4.conf.all.proxy_arp = 1" >> /etc/sysctl.conf
sudo sysctl -p /etc/sysctl.conf

# to add iptables forwarding rules on bounce servers
iptables -A INPUT -m conntrack --ctstate RELATED,ESTABLISHED -j ACCEPT
iptables -A FORWARD -m conntrack --ctstate RELATED,ESTABLISHED -j ACCEPT
iptables -A FORWARD -i wg0 -o wg0 -m conntrack --ctstate NEW -j ACCEPT
iptables -t nat -A POSTROUTING -s 192.168.2.0/24 -o eth0 -j MASQUERADE

Simple script for generating key pairs and base cofigs for server and client

#!/bin/bash

HOST=wg.reverse.org.ua
PORT=32001
S_IP=192.168.2.1/24
C_IP=192.168.2.3/32

#create Server key
`wg genkey | tee wg-s-private.key | wg pubkey > wg-s-public.key`
#create Client key
`wg genkey | tee wg-c-private.key | wg pubkey > wg-c-public.key`

S_PRIV_KEY=`cat wg-s-private.key`
S_PUB_KEY=`cat wg-s-public.key`
C_PRIV_KEY=`cat wg-c-private.key`
C_PUB_KEY=`cat wg-c-public.key`


cat >wg0.server <<EOF
[Interface]
Address = ${S_IP}
ListenPort = ${PORT}
PrivateKey = ${S_PRIV_KEY}
DNS = 1.1.1.1,8.8.8.8

[Peer]
# Name = notebook
PublicKey = ${C_PUB_KEY}
AllowedIPs = ${C_IP}
EOF

cat >wg0.client <<EOF
[Interface]
# Name = laptop
Address = ${C_IP}
PrivateKey = ${C_PRIV_KEY}
DNS = 1.1.1.1,8.8.8.8
# If you have additional local networks, add static routes for it
#PostUp = ip route add 10.97.0.0/16 via 10.0.1.1; 
#PreDown = ip route delete 10.97.0.0/16

[Peer]
Endpoint = ${HOST}:${PORT}
PublicKey = ${S_PUB_KEY}
# routes traffic to itself and entire subnet of peers as bounce server
AllowedIPs = ${S_IP},0.0.0.0/0,::/0
PersistentKeepalive = 25

EOF

Or download here:

Put wg0.server as /etc/wireguard/wg0.conf on Server side and wg0.client on Client side in the same place

Startup interface on machines

wg-quick up wg0

For Android clients you can use config file as QR code

qrencode -t ansiutf8 < wg0.client

Vagrant: libvirt library not found in default locations (RuntimeError)

vagrant plugin install vagrant-libvirt
Installing the 'vagrant-libvirt' plugin. This can take a few minutes...
Bundler, the underlying system Vagrant uses to install plugins,
reported an error. The error is shown below. These errors are usually
caused by misconfigured plugin installations or transient network
issues. The error from Bundler is:
 
An error occurred while installing ruby-libvirt (0.5.2), and Bundler cannot continue.
Make sure that `gem install ruby-libvirt -v '0.5.2'` succeeds before bundling.
 
Warning: this Gemfile contains multiple primary sources. Using `source` more than once without a block is a security risk, and may result in installing unexpected gems. To resolve this warning, use a block to indicate which gems should come from the secondary source. To upgrade this warning to an error, run `bundle config disable_multisource true`.Gem::Installer::ExtensionBuildError: ERROR: Failed to build gem native extension.
 
    /opt/vagrant/embedded/bin/ruby extconf.rb
*** extconf.rb failed ***
Could not create Makefile due to some reason, probably lack of necessary
libraries and/or headers.  Check the mkmf.log file for more details.  You may
need configuration options.
 
Provided configuration options:
	--with-opt-dir
	--with-opt-include
	--without-opt-include=${opt-dir}/include
	--with-opt-lib
	--without-opt-lib=${opt-dir}/lib
	--with-make-prog
	--without-make-prog
	--srcdir=.
	--curdir
	--ruby=/opt/vagrant/embedded/bin/ruby
	--with-libvirt-include
	--without-libvirt-include
	--with-libvirt-lib
	--without-libvirt-lib
	--with-libvirt-config
	--without-libvirt-config
	--with-pkg-config
	--without-pkg-config
extconf.rb:73:in `<main>': libvirt library not found in default locations (RuntimeError)
 
 
Gem files will remain installed in /home/reverse/.vagrant.d/gems/gems/ruby-libvirt-0.5.2 for inspection.
Results logged to /home/reverse/.vagrant.d/gems/gems/ruby-libvirt-0.5.2/ext/libvirt/gem_make.out

Fix this problem with Vagrant

apt-get install libvirt-dev

Не работает звуковая VIA VT8237A/VT8251

Под Линуксом не работал звук
lspci:

80:01.0 Audio device: VIA Technologies, Inc. VT8237A/VT8251 HDA Controller

Боролся разными методами, думая, что проблема в самом ALSA
И вдруг заметил:

[ 7.785270] hda-intel: ioremap error
[ 7.785277] HDA Intel 0000:80:01.0: PCI INT A disabled

Как то далеко залезла звуковуха по шине…
В итоге решение банальное, в опции загрузки ядра нужно добавить pci=use_crs вот так :

/boot/grub/grub.cfg
.....
kernel ........ pci=use_crs
....

Вот и все. Звук сразу заработал 🙂

MSI + Ubuntu 11.04 = не работает звук и видео

Будь проклят тот день когда я связался с материнкой MSI V-series
Проблемы: не работает звук в принципе и только запускаешь любое видео Gnome вылетает с Segmentation fault на окно Login-а

Backtrace:
[   968.579] 0: /usr/bin/X (xorg_backtrace+0x3b) [0x80eab1b]
[   968.580] 1: /usr/bin/X (0x8048000+0x5fac8) [0x80a7ac8]
[   968.580] 2: (vdso) (__kernel_rt_sigreturn+0x0) [0x67440c]
[   968.580] 3: /usr/lib/xorg/modules/drivers/openchrome_drv.so (0xf05000+0x26798) [0xf2b798]
[   968.580] 4: /usr/bin/X (0x8048000+0x140c26) [0x8188c26]
[   968.580] 5: /usr/bin/X (0x8048000+0x141682) [0x8189682]
[   968.580] 6: /usr/bin/X (miHandleValidateExposures+0x83) [0x81bc133]
[   968.580] 7: /usr/bin/X (miMoveWindow+0x20c) [0x81bc3ac]
[   968.580] 8: /usr/bin/X (0x8048000+0xa7f0b) [0x80eff0b]
[   968.580] 9: /usr/bin/X (ConfigureWindow+0x49d) [0x809a3cd]
[   968.580] 10: /usr/bin/X (0x8048000+0x22239) [0x806a239]
[   968.580] 11: /usr/bin/X (0x8048000+0x28167) [0x8070167]
[   968.580] 12: /usr/bin/X (0x8048000+0x1a81c) [0x806281c]
[   968.581] 13: /lib/i386-linux-gnu/libc.so.6 (__libc_start_main+0xe7) [0x19ee37]
[   968.581] 14: /usr/bin/X (0x8048000+0x1a411) [0x8062411]
[   968.581] Segmentation fault at address 0x1b7
[   968.581] 
Caught signal 11 (Segmentation fault). Server aborting
[   968.581] 
Please consult the The X.Org Foundation support 
	 at http://wiki.x.org
 for help. 
[   968.581] Please also check the log file at "/var/log/Xorg.0.log" for additional information.
[   968.581]

Read more

Luminance HDR 2.0.2

Luminance

Как это обычно случается, самый новый софт отсутствует в репозиториях Убунты.
Посему ставим Luminance руками
Read more

Фиолетовое видео на Youtube в Ubuntu

Вид Ютуба

Вид Ютуба


После одного из обновлений у пользователей Ubuntu при просмотре видео с Youtube картинка стала фиолетовой (красной).
Всему виной недавно прибывшие обновления на Flash 10.2, а так же настройки самого видео-сервиса…. хотя некоторые утверждают, что еще влияет видео карта.
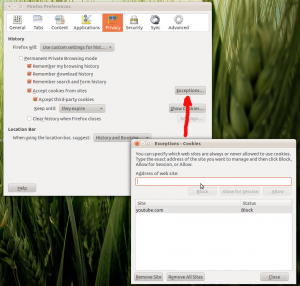
Для меня решением проблемо было отключение cookie в браузере.
Отключение Cookie в Firefox

Отключение Cookie в Firefox


Если это действие не помогло, то можно попробовать отключить аппаратное ускорение в Adobe Flash
Для это нужно в консоли ввести:

sudo mkdir /etc/adobe
sudo bash -c "echo 'OverrideGPUValidation = 0' >> /etc/adobe/mms.cfg"

Read more

Использование хост-интерфейса для виртуальной машины в Ubuntu

Начиная с версии 2.1.0, VirtualBox поддерживает использование хост-интерфейса «из-коробки». Добавьте vboxnetflt в секцию MODULES вашего rc.conf и выберите Host Interface Networking в настройках виртуальной машины.

Для более старых версий необходимо проделать несколько манипуляций 🙂

читаем далее……

Read more