Posts Tagged ‘ Virtualization

Make simple Kubernetes cluster and deploy own Golang application

Main goal to create simple cluster with one master node and two worker-nodes .

All procedures we will do on 3 VPS with Ubuntu 20.04 Server installation. First step is to create separate user on all VPS, for the test environment let it be ‘kubuntu’. For orchestration we will use Ansible

Lets create directory for Ansible and make inventory file

mkdir kube
cd kube
touch hosts

Write config to hosts file

---
masters:
  hosts:
    kmaster:
      ansible_host: 10.0.1.7
workers:
  hosts:
    kworker1:
      ansible_host: 10.0.1.8
    kworker2:
      ansible_host: 10.0.1.9

Now we want to create playbook initial.yml for Ansible that create user on VPS

- hosts: all
  become: yes
  tasks:
    - name: create the 'kubuntu' user
      user: name=kubuntu append=yes state=present createhome=yes shell=/bin/bash
    - name: allow 'kubuntu' to have passwordless sudo
      lineinfile:
        dest: /etc/sudoers
        line: 'kubuntu ALL=(ALL) NOPASSWD: ALL'
        validate: 'visudo -cf %s'
    - name: set up authorized keys for the ubuntu user
      authorized_key: user=kubuntu key="{{item}}"
      with_file:
        - ~/.ssh/id_rsa.pub

Run playbook

ansible-playbook -i hosts initial.yml

Installing packages for Kubernetes, but first we need create template for configuring Docker. It’s need for disable cgroupfs as default docker driver and set systemd. Please follow the guide at https://kubernetes.io/docs/setup/cri/

Make file templates/docker.daemon.j2

{
  "exec-opts": ["native.cgroupdriver=systemd"],
  "log-driver": "json-file",
  "log-opts": {
    "max-size": "100m"
  },
  "storage-driver": "overlay2"
}

Maybe need to edit nano /var/lib/kubelet/kubeadm-flags.env for systemd

Now create playbook kube-dependencies.yml

- hosts: all
  become: yes
  tasks:
   - name: install Docker
     apt:
       name: docker.io
       state: present
       update_cache: true
   - name: Enable systemD cgroups
     template:
       src: templates/docker.daemon.j2
       dest: /etc/docker/daemon.json

   - name: Start Docker
     service:
       name: docker
       state: started
       enabled: yes

   - name: install APT Transport HTTPS
     apt:
       name: apt-transport-https
       state: present

   - name: add Kubernetes apt-key
     apt_key:
       url: https://packages.cloud.google.com/apt/doc/apt-key.gpg
       state: present

   - name: add Kubernetes' APT repository
     apt_repository:
      repo: deb http://apt.kubernetes.io/ kubernetes-xenial main
      state: present
      filename: 'kubernetes'

   - name: install kubelet
     apt:
       name: kubelet=1.18.0-00
       state: present
       update_cache: true

   - name: install kubeadm
     apt:
       name: kubeadm=1.18.0-00
       state: present

   - name: Disable SWAP since kubernetes can't work with swap enabled (1/2)
     become: yes
     shell: |
       swapoff -a

   - name: Disable SWAP in fstab since kubernetes can't work with swap enabled (2/2)
     become: yes
     replace:
       path: /etc/fstab
       regexp: '^([^#].*?\sswap\s+sw\s+.*)$'
       replace: '# \1'


- hosts: master
  become: yes
  tasks:
   - name: install kubectl
     apt:
       name: kubectl=1.18.0-00
       state: present
       force: yes

In this playbook we install latest kubelet, kubead version ( 1.18), disable swap and remove it from fstab. On master node additionaly setup kebectl

Make playbook masters.yml for configuring master node

- hosts: masters
  become: yes
  tasks:
    - name: initialize the cluster
#      shell: kubeadm init --pod-network-cidr=10.244.0.0/16 >> cluster_initialized.txt
      shell: kubeadm init --pod-network-cidr=10.244.0.0/16 --ignore-preflight-errors=all >> cluster_initialized.txt
      args:
        chdir: $HOME
        creates: cluster_initialized.txt

    - name: create .kube directory
      become: yes
      become_user: kubuntu
      file:
        path: $HOME/.kube
        state: directory
        mode: 0755

    - name: copy admin.conf to user's kube config
      copy:
        src: /etc/kubernetes/admin.conf
        dest: /home/kubuntu/.kube/config
        remote_src: yes
        owner: kubuntu

    - name: install Pod network
      become: yes
      become_user: kubuntu
      tags: flannel
      shell: kubectl apply -f https://raw.githubusercontent.com/coreos/flannel/master/Documentation/kube-flannel.yml >> pod_network_setup.txt
      args:
        chdir: $HOME
        creates: pod_network_setup.txt

Run playbook:

ansible-playbook -i hosts masters.yml

In my case i used option flag ‘-ignore-preflight-errors=all’ because Kubernetes need 2 or more CPU cores and my VPS have only 1.

Go to the master node and check that cluster is up and running

kubectl get nodes
NAME      STATUS   ROLES    AGE     VERSION
kmaster   Ready    master   8m35s   v1.18.0

If everything OK we can start add worker-node to cluster. Create workers.yml

- hosts: masters
  become: yes
  gather_facts: false
  tasks:
    - name: get join command
      shell: kubeadm token create --print-join-command
      register: join_command_raw

    - name: set join command
      set_fact:
        join_command: "{{ join_command_raw.stdout_lines[0] }}"


- hosts: workers
  become: yes
  tasks:
    - name: join cluster
      shell: "{{ hostvars['kmaster'].join_command }} >> node_joined.txt"
      args:
        chdir: $HOME
        creates: node_joined.txt

Run playbook

ansible-playbook -i hosts workers.yml

Check workers in cluster

kubectl get nodes
NAME       STATUS   ROLES    AGE    VERSION
kmaster    Ready    master   15m    v1.18.0
kworker1   Ready    <none>   116s   v1.18.0
kworker2   Ready    <none>   117s   v1.18.0

Test our cluster by adding test nginx service that only show “Hello page”

kubuntu@kmaster:~$ kubectl create deployment nginx --image=nginx
deployment.apps/nginx created
kubuntu@kmaster:~$ kubectl expose deploy nginx --port 80 --target-port 80 --type NodePort
service/nginx exposed
kubuntu@kmaster:~$ kubectl get services
NAME         TYPE        CLUSTER-IP      EXTERNAL-IP   PORT(S)        AGE
kubernetes   ClusterIP   10.96.0.1       <none>        443/TCP        16m
nginx        NodePort    10.106.156.95   <none>        80:32709/TCP   12s

If we are in the same network as nginx than just go to browser and open page http://10.106.156.95 . Or we can use curl

curl -v 10.106.156.95
*   Trying 10.106.156.95:80...
* TCP_NODELAY set
* Connected to 10.106.156.95 (10.106.156.95) port 80 (#0)
> GET / HTTP/1.1
> Host: 10.106.156.95
> User-Agent: curl/7.68.0
> Accept: */*
> 
* Mark bundle as not supporting multiuse
< HTTP/1.1 200 OK
< Server: nginx/1.17.10
< Date: Mon, 27 Apr 2020 14:12:48 GMT
< Content-Type: text/html
< Content-Length: 612
< Last-Modified: Tue, 14 Apr 2020 14:19:26 GMT
< Connection: keep-alive
< ETag: "5e95c66e-264"
< Accept-Ranges: bytes
< 
<!DOCTYPE html>
<html>
<head>
<title>Welcome to nginx!</title>

Works as expected. Cleaning up

kubectl delete service nginx

Chapter 2. Deploy own Golang app

Create directory for application

mkdir go_app
cd go_app
nano main.go

Code inside

package main

import (
	"fmt"
	"time"

	"github.com/gin-gonic/gin"
	"os"
	"gopkg.in/yaml.v2"
	"io/ioutil"
	"log"
)

type conf struct {
    Text string `yaml:"text"`
    Code int `yaml:"code"`
}

func (c *conf) getConf() *conf {
    filename := "/etc/ping/config.yml"
//    filename := "config.yml"
    _, err := os.Stat(filename)
    if os.IsNotExist(err) {
	c.Text = "Pong"
	c.Code = 200
    } else {
      yamlFile, err := ioutil.ReadFile(filename)
      if err != nil {
        log.Printf("yamlFile.Get err   #%v ", err)
      }
      err = yaml.Unmarshal(yamlFile, c)
      if err != nil {
        log.Fatalf("Unmarshal: %v", err)
      }
    }

    return c
}


func main() {
	
	var c conf
        c.getConf()
	router := gin.New()

	// LoggerWithFormatter middleware will write the logs to gin.DefaultWriter
	// By default gin.DefaultWriter = os.Stdout
	router.Use(gin.LoggerWithFormatter(func(param gin.LogFormatterParams) string {

		// your custom format
		return fmt.Sprintf("%s - [%s] \"%s %s %s %s %d %s \"%s\" %s BODY: %s\"\n",
			param.ClientIP,
			param.TimeStamp.Format(time.RFC1123),
			param.Method,
			param.Request.Host,
			param.Path,
			param.Request.Proto,
			param.StatusCode,
			param.Latency,
			param.Request.UserAgent(),
			param.ErrorMessage,
			param.Request.Body,
		)
	}))
	router.Use(gin.Recovery())

	router.GET("/ping", func(g *gin.Context) {
		g.String(c.Code, c.Text)
	})
	
	router.Run(":9991")

	
}

Thin app get request on endpoint /ping log this request to stdout and send answer to client with text “pong”. If config.yml exist then we override answer and code:

text: pong by config
code: 200

Main code was taken from post on Mediun – https://medium.com/google-cloud/deploy-go-application-to-kubernetes-in-30-seconds-ebff0f51d67b with some changes. So, for start, lets build our app:

go build 
go run main.go

If everything ok than start to create Makefile for automation.

cat Makefile 
#TAG?=$(shell git rev-list HEAD --max-count=1 --abbrev-commit)
TAG=0.1.2
export TAG

install:
	go get .

build: install
	go build -ldflags  "-X main.version=$(TAG) -w -s -linkmode external -extldflags -static"  -o  ping_app .

pack: build
	GOOS=linux make build
	docker build -t <registry-host>/myproject/ping_app:$(TAG) .

upload: pack
	docker push <registry-host>/myproject/ping_app:$(TAG)
deploy:
	envsubst < k8s/deployment.yml | kubectl apply -f -

If you code tracked by Git – use first line for assign TAG var, or use static version like in second line. make command now have some option that include some actions. For example pack use previous action build and after build Docker image with TAG. If you do not have your private docker registry, start it by docker-compose via manual – https://docs.docker.com/registry/ or https://www.digitalocean.com/community/tutorials/how-to-set-up-a-private-docker-registry-on-top-of-digitalocean-spaces-and-use-it-with-digitalocean-kubernetes

For creating docker image we need to create Dockerfile with actions for start out app

cat Dockerfile 
FROM alpine:3.4

RUN apk -U add ca-certificates

EXPOSE 9991

ADD ping_app /bin/ping_app
#RUN chmod +x /bin/ping_app
ADD config.yml /etc/ping/config.yml

CMD ["/bin/ping_app", "-config", "/etc/ping/config.yml"]

This Docker file start/create image with our binary and config file, and expose port 9991

When we run make pack and make upload our image creates and upload to registry, now we need only deploy image/service to kubernetes ( deploy action in Makefile)

cat k8s/deployment.yml 
apiVersion: apps/v1
kind: Deployment
metadata:
  name: ping-service
  labels:
    app: ping-service
spec:
  replicas: 1
  selector:
    matchLabels:
      app: ping-service
  template:
    metadata:
      labels:
        app: ping-service
    spec:
      imagePullSecrets:
      - name: regcred
      containers:
      - name: ping-service
        image: <registry-host>/myproject/ping_app:0.1.3
        command:
        ports:
          - containerPort: 9991
        volumeMounts:
          - name: ping-config
            mountPath: /etc/ping/
            readOnly: true
      volumes:
        - name: ping-config
          configMap: { name: ping-config }
---
kind: Service
apiVersion: v1
metadata:
  name: ping-service
spec:
  type: LoadBalancer
  selector:
    app: ping-service
  ports:
  - protocol: TCP
    port: 80
    targetPort: 9991

Some comments…

selector: matchLabels: it is like a link for knowing what servise for what deployment need to use

imagePullSecrets: - name: regcred – i have Docker registry with credentials, so we need somehow to say that kubernetes need to use login/password for pulling images. Simplest way to do this it is a login to Docker-registry docker login my-registry-url:5000 and they will create config to <homeDir>/.docker/config . Add this config to our Kubernetes via command:

kubectl create secret generic regcred \
    --from-file=.dockerconfigjson=/home/kubuntu/.docker/config.json \
    --type=kubernetes.io/dockerconfigjson

We register secret with name regcred to cluster and use it in imagePullSecrets

This part of config need to pass our config to cluster, but we need way to update config without rebuild all image in registry.

        volumeMounts:
          - name: ping-config
            mountPath: /etc/ping/
            readOnly: true
      volumes:
        - name: ping-config
          configMap: { name: ping-config }

We will use config-map as volume and mount to /etc/ping/ . How to create config in cluster? simple…

cat k8s/configmap.yml 
kind: ConfigMap
apiVersion: v1
metadata:
  name: ping-config
data:
  config.yml: |-
    text: pong by config
    code: 200

run kubectl apply -f configmap.yml

With this map we can update our configmap and file config.yml will be changed in cluster automaticaly.

Last step is to run make deploy

make deploy
envsubst < k8s/deployment.yml | kubectl apply -f -
deployment.apps/ping-service configured
service/ping-service changed

See what we have:

go_app $ kubectl get services
NAME           TYPE           CLUSTER-IP      EXTERNAL-IP   PORT(S)        AGE
kubernetes     ClusterIP      10.96.0.1       <none>        443/TCP        3d23h
ping-service   LoadBalancer   10.98.133.140   <pending>     80:31842/TCP   25h

go_app $ kubectl get deployments.apps 
NAME           READY   UP-TO-DATE   AVAILABLE   AGE
nginx          1/1     1            1           3d23h
ping-service   1/1     1            1           25h

go_app $ kubectl get pods
NAME                           READY   STATUS    RESTARTS   AGE
nginx-f89759699-7j8v6          1/1     Running   1          3d23h
ping-service-d545db97b-496p4   1/1     Running   0          25h

we can do curl -v 10.98.133.140 and cluster answers pong via config

Tutorials used:

Redirect port to guest in libvirt

If you want to redirect ports from WAN to quest Virtual Machine than you may do this:
Go to edit VM from Virsh

virsh edit my-vm-name

In header add xmlns

<domain type='kvm' xmlns:qemu='http://libvirt.org/schemas/domain/qemu/1.0'>

Change interface type to user

<interface type='network'>

to this:

<interface type='user'>

Read more

Автостарт виртуальных машин в XenServer 6.2(6.x)

В отличии от предыдущих версий, графическая оболочка XenCenter не содержит опции по настройке автостарта виртуалок. Если я не ошибаюсь, то данную функциональность перенесли в интерфейс HA (High Availability)
Но все это доступно с консоли.
Сначала нужно указать автостарт для всего пула (pool)
Заходим на XenServer по ssh, и смотрим uuid всего пула:

[root@localhost ~]# xe pool-list
uuid ( RO)                : 8a28925c-9c9d-25af-7c87-d08376e57516
          name-label ( RW):
    name-description ( RW):
              master ( RO): 235d4c41-f310-4bba-b1e8-9505b3cede83
          default-SR ( RW): 8f7f2c38-dd71-ed21-1967-057f94d2464b

Read more

Установка Xen-tools в гостевом debian

Для установки Xen tools в гостевой виртуальной машине, которая крутится на XenServer 6.2 нужно проделать такие манипуляции.
Заходим в XenCenter.
xencenter
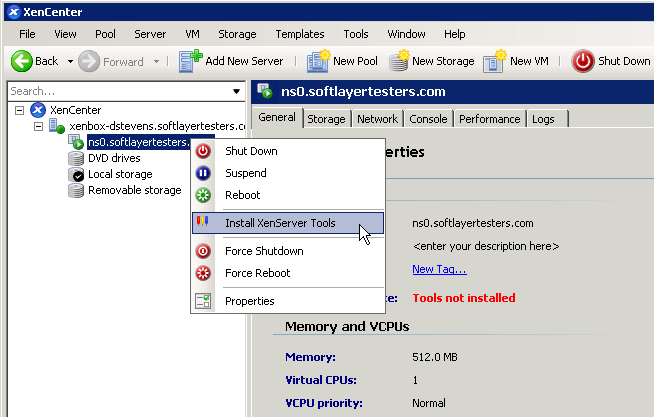
Выбираем Install XenTools
Read more

Драйвера Intel и VMWare ESXi 5.1

Предистория: жил-был сервер с виртуалками и в один прекрасный момент он умер (высыпался винт). Развернули новый. Со старого выкинули винчестер, вставили живой винт и поставили туды ESXi 5.1
Для того, чтобы заставить ESXi 5.1 видить сетевые карты Intel Corporation 82573E Gigabit Ethernet Controller и Intel Corporation 82573L Gigabit Ethernet Controller нужно подкинуть ему драйвера с ESXi 5.0
Для это нужна флешка с FAT16.
Делаем
-запускаем DiskPart (Пуск\Выполнить\DiskPart).
-В окно DiskPart пишем:

select volume g:
clean
create partition primary size=4095
format fs=fat quick
exit

Read more

Xen приняли в основную ветку ядра

Последние 2 года Xen планомерно впиливался в ядро Линукса.
И наконец-то его всунули полностью. Начиная с новой ветки ядра Linux 3.0, которая появилась вместо 2.6.40 (так как от 2.6 почти ничего не осталось), Xen как Dom0 сможет запускаться без каких то манипуляций с ядром (патчинг и т.д.), так же как и KVM, VirtualBox и другие.
Может в будущем Дебиановцы передумают отказываться от Ксена 🙂

For the past two years, Xen infrastructure has been getting included in the Linux kernel piece by piece. It’s finally done. A nice coincidence is that new version we’ll be called 3.0 instead of 2.6.30 – just like Xen was the feature so important it justified the change (in reality, there was no single large addition, just the sum of small changes since 2.6.0 made today kernel something completely different).

Soon an ordinary Linux system will be able to run as Xen dom0 (host) without any changes in the kernel, just like it is with KVM, VirtualBox and some other virtualization solutions. I hope it will stop the decline of Xen: when it’s no harder to setup then its competitors and offers better performance, it’s becoming and interesting choice again.

Gentoo Xen 4

Повесть о том как я Xen4 мучал… или он меня…..
Что мы имеем:

uname -a
Linux Gentoo 2.6.34-xen-r4 #3 SMP Sat Jan 1 19:30:46 EET 2011 x86_64 AMD Phenom(tm) II X4 925 Processor AuthenticAMD GNU/Linux

И почти мертвый винт на 500Г

  5 Reallocated_Sector_Ct   0x0033   090   090   140    Pre-fail  Always   FAILING_NOW 873

Перед установкой пакетов необходимо снять с них архитектурное маскирование (~x64):

echo "app-emulation/xen
app-emulation/xen-tools
sys-kernel/xen-sources" >> /etc/portage/package.keywords

До начала сборки нужно выполнить следующие шаги:

1. Добавить в /etc/make.conf опции компилятора:

      CFLAGS="-march=native -O2 -pipe -fomit-frame-pointer -mfpmath=sse -funroll-loops -mno-tls-direct-seg-refs"
      CXXFLAGS="${CFLAGS}"

2. Там же (в /etc/make.conf), можно включить опции сборки бинарных пакетов (готовые пакеты emerge разместит в /usr/portage/packages), они пригодятся для ускоренного развертывания domU:

      FEATURES="buildpkg"

3. Пересобрать текущее окружение с новой опцией компилятора, которая нужна корректной работы системного окружения с гипервизором xen (заодно построятся бинарные пакеты окружения):

      emerge -evat world

Предварительный этап окончен, можно запускать сборку/установку пакетов xen, xen-tools и исходников адаптированного для Xen ядра — xen-sources:

emerge -av xen-sources xen xen-tools

Read more