Author Archive

Error install nokogiri

Fetching: mini_portile-0.6.2.gem (100%)
Fetching: nokogiri-1.6.6.3.gem (100%)
Building native extensions.  This could take a while...
ERROR:  Error installing nokogiri:
	ERROR: Failed to build gem native extension.
 
        /usr/bin/ruby1.9.1 extconf.rb
checking if the C compiler accepts ... yes
Building nokogiri using packaged libraries.
checking for gzdopen() in -lz... no
zlib is missing; necessary for building libxml2
*** extconf.rb failed ***
Could not create Makefile due to some reason, probably lack of
necessary libraries and/or headers.  Check the mkmf.log file for more
details.  You may need configuration options.
 
Provided configuration options:
	--with-opt-dir
	--without-opt-dir
	--with-opt-include
	--without-opt-include=${opt-dir}/include
	--with-opt-lib
	--without-opt-lib=${opt-dir}/lib
	--with-make-prog
	--without-make-prog
	--srcdir=.
	--curdir
	--ruby=/usr/bin/ruby1.9.1
	--help
	--clean
	--use-system-libraries
	--enable-static
	--disable-static
	--with-zlib-dir
	--without-zlib-dir
	--with-zlib-include
	--without-zlib-include=${zlib-dir}/include
	--with-zlib-lib
	--without-zlib-lib=${zlib-dir}/lib
	--enable-cross-build
	--disable-cross-build
 
 
Gem files will remain installed in /var/lib/gems/1.9.1/gems/nokogiri-1.6.6.3 for inspection.
Results logged to /var/lib/gems/1.9.1/gems/nokogiri-1.6.6.3/ext/nokogiri/gem_make.out

Fix
Read more

Telegram Bot on ruby

apt-get install ruby gem ruby-dev make
gem install telegram-bot-ruby

Теперь необходимо получить токен для бота.
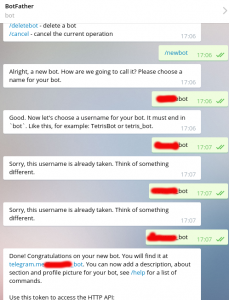
Заходим в Telegram, добавляем бота @BotFather, и создаем бота:

Telegram Bot

Telegram Bot

So, let’s write to out bot and get updates

curl -s -X POST https://api.telegram.org/botNNNNN:NZNZNNZNZNZNNZNZ/getUpdates

And we have:

{"ok":true,"result":[{"update_id":923096141,
"message":{"message_id":2130,"from":{"id":<id>,"first_name":"<fname>","username":"<username>"},"chat":{"id":<chat.id>,"first_name":"<fname>","username":"<username>","type":"private"},"date":1447842513,"text":"test"}}]}
# encoding: utf-8
#
require 'telegram/bot'
#require_relative 'getimg'
token = 'NNNNNN:XNXNXNXNXNXNXNXNX'
 
#inputMess = ARGV[0]
puts "fff"
Telegram::Bot::Client.run(token) do |bot|
    #  bot.listen do |chat|
    #bot.fetch_updates
    bot.api.sendMessage(chat_id: "<chat.id>", text: "Hello")
 
end

ESP8266 first launch in Linux Mint

esp8266-01 pin

esp8266-01 pin


For flashing firmware you need connect GPIO0 to GND and CH_PD to VCC
I have this TTL converter

Bus 003 Device 026: ID 067b:2303 Prolific Technology, Inc. PL2303 Serial Port

But they have 5v output, so i used 5v to 3.3v converter

5v-to-3.3v

5v-to-3.3v

Prepare notebook for flashing
Go to https://github.com/themadinventor/esptool
and download esptool

wget https://github.com/themadinventor/esptool/archive/master.zip

install Python pip

apt-get -y install python-pip

Inzip our master.zip

unzip esptool-master.zip

Run installing dependency

python setup.py install

Read more

Redirect port to guest in libvirt

If you want to redirect ports from WAN to quest Virtual Machine than you may do this:
Go to edit VM from Virsh

virsh edit my-vm-name

In header add xmlns

<domain type='kvm' xmlns:qemu='http://libvirt.org/schemas/domain/qemu/1.0'>

Change interface type to user

<interface type='network'>

to this:

<interface type='user'>

Read more

Добавить существующий Git репозиторий в Bitbucket

git clone --mirror https://bitbucket.org/exampleuser/repository-to-mirror.git
# Make a bare mirrored clone of the repository
 
cd repository-to-mirror.git
git remote set-url --push origin https://github.com/exampleuser/mirrored
# Set the push location to your mirror
 
git push --mirror

Cisco 7940 за NAT

http://www.cisco.com/c/en/us/td/docs/voice_ip_comm/cuipph/7960g_7940g/5_0/sip/english/administration/guide/5_0/7960setS.html

Some general advice on how to get 7940/7960 going in standalone SIP via NAT.

1. Give your 7940 a static IP.
2. Forward ports 5060-5062 TCP and UDP and 16384 to 16399 UDP to the static IP of the 7940.
3. Make configuration file adjustments as follows:

Set voip_control_port: 5061

; NAT/Firewall Traversal- 0=Disabled, 1=Enabled
nat_enable: 1
nat_address: “”
nat_received_processing: 1

; Start RTP range for media (default – 16384)
Start_media_port: 16384

; End RTP range for media (default – 32766)
end_media_port: 16399

; Register or Not
proxy_register: 1

Linux: рекурсивно создать структуру директоний

Все гениальное просто 🙂
при mkdir нужен ключ -p

mkdir -p /usr/local/dir1/dir2/dir3/VIP

В результате создастся структура каталогов даже если еще нет dir*

Linux: убрать пробелы в именах файлов

for d in *\ *; do mv "$d" "${d// /}"; done

Vagrant: libvirt library not found in default locations (RuntimeError)

vagrant plugin install vagrant-libvirt
Installing the 'vagrant-libvirt' plugin. This can take a few minutes...
Bundler, the underlying system Vagrant uses to install plugins,
reported an error. The error is shown below. These errors are usually
caused by misconfigured plugin installations or transient network
issues. The error from Bundler is:
 
An error occurred while installing ruby-libvirt (0.5.2), and Bundler cannot continue.
Make sure that `gem install ruby-libvirt -v '0.5.2'` succeeds before bundling.
 
Warning: this Gemfile contains multiple primary sources. Using `source` more than once without a block is a security risk, and may result in installing unexpected gems. To resolve this warning, use a block to indicate which gems should come from the secondary source. To upgrade this warning to an error, run `bundle config disable_multisource true`.Gem::Installer::ExtensionBuildError: ERROR: Failed to build gem native extension.
 
    /opt/vagrant/embedded/bin/ruby extconf.rb
*** extconf.rb failed ***
Could not create Makefile due to some reason, probably lack of necessary
libraries and/or headers.  Check the mkmf.log file for more details.  You may
need configuration options.
 
Provided configuration options:
	--with-opt-dir
	--with-opt-include
	--without-opt-include=${opt-dir}/include
	--with-opt-lib
	--without-opt-lib=${opt-dir}/lib
	--with-make-prog
	--without-make-prog
	--srcdir=.
	--curdir
	--ruby=/opt/vagrant/embedded/bin/ruby
	--with-libvirt-include
	--without-libvirt-include
	--with-libvirt-lib
	--without-libvirt-lib
	--with-libvirt-config
	--without-libvirt-config
	--with-pkg-config
	--without-pkg-config
extconf.rb:73:in `<main>': libvirt library not found in default locations (RuntimeError)
 
 
Gem files will remain installed in /home/reverse/.vagrant.d/gems/gems/ruby-libvirt-0.5.2 for inspection.
Results logged to /home/reverse/.vagrant.d/gems/gems/ruby-libvirt-0.5.2/ext/libvirt/gem_make.out

Fix this problem with Vagrant

apt-get install libvirt-dev

Mysql 5.7: ERROR 1862 (HY000): Your password has expired. To log in you must change it using a client that supports expired passwords.

В версии mysql 5.7 теперь нужно обязательно указывать время жизни пароля для root пользователя.
Это может застать в расплох в самый неподходящий момент, особенно во время рестарта приложения.
Чтобы этого избежать рекомендуэтся задать время его жизни такими способами.
Установиль дефолтное значение через конфиг:

Задаем 180дней

    [mysqld]
    default_password_lifetime=180

Безлимитные пароли:

    [mysqld]
    default_password_lifetime=0

Read more

Генерация паролей в консоли Linux

Для этого можно использовать простенькую програмку makepasswd

sudo apt-get install makepasswd

Использовать makepasswd довольно просто

makepasswd --chars 16 --count 7
88mCpPSqU8TW92cI
3HPpuSnFEGPwAyij
rEaYNRPbhBByPtwT
WhgoJAKs2iCYhYpr
PCsMx7A9JY3SGRVr
Hd4PU9vRIKhnhG8L
1QQNpn3JAo086oJW

Read more